An in-depth yet accessible guide on how to configure retention policies, archive policies, and enable archive mailboxes in Office 365. Whilst we are at it we will also increase the recoverable items time from 14 to the maximum of 30 days. Currently, this has to be done in the Exchange Admin Center (EAC) and PowerShell and not the Security & Compliance Center (at the time of writing).
Also note that Exchange Online Plan 1 (included with Office 365 Business Premium) include a 50GB mailbox limit and 50GB archive, Exchange Online Plan 2 which has a 100GB mailbox and unlimited Archive (included with Enterprise E3 or better). Microsoft 365 Business also includes unlimited archiving confusingly even though it is EOP1, see https://docs.microsoft.com/en-us/office365/servicedescriptions/microsoft-365-business-service-description. You will also need a supported version of Outlook, see https://support.office.com/en-us/article/outlook-license-requirements-for-exchange-features-46b6b7c5-c3ca-43e5-8424-1e2807917c99?ui=en-US&rs=en-US&ad=US.
This article assumes that you have relatively straightforward requirements, i.e. you need to apply the same archive settings to all users.
If you follow this guide you will end up with the following functionality:
- All users will have an archive policy which moves email to their archive mailbox after 6 months.
- Items will be kept in deleted items for 30 days, after which they will be moved to recoverable delete items.
- Recoverable deleted items will be available for an additional 30 days.
Note that this section applies to Exchange Online Retention Policies, which should not be confused with the Retention Policies created through the Security & Compliance Center, even though confusingly they are called the same thing. This configuration is separate to any retention policies that you may have set in the Security & Compliance Center, and can be used in conjunction with those. For example, if you set a retention policy to keep all email data for 6 years for compliance reasons, even though users will not be able to see items once the Exchange retention period has passed, compliance administrators will still be able to find the emails.
Prerequisites
You need to have mailboxes in Office 365/Exchange Online, as well as E3 or Exchange Online Plan 2 licenses in order to take advantage of archive mailboxes.
Background
Firstly, you need a basic level of understanding of retention tags and policies in Exchange. These were introduced in Exchange 2010 as a way of automatically tagging emails and taking actions based on those tags, as well as allowing users to tag their own emails from a set of pre-configured personal tags.
The following diagram is from https://docs.microsoft.com/en-us/exchange/security-and-compliance/messaging-records-management/retention-tags-and-policies:
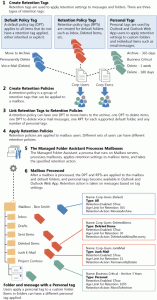
In addition to this, Exchange Online has Mailbox Plans, which can automatically apply the Retention Policies and their tags. The following diagram shows the overall process:
The following principles apply to retention policies and tags:
- Retention policies are set per mailbox.
- You can only have one retention policy per mailbox. However, the policy can have multiple tags.
- An item can only have one retention tag applied at a time. If there are conflicts, the longest retention period will take priority.
- Retention tags are only applied to items that are younger than the retention period. i.e. if you create a 30-day archive policy, items younger than this will be tagged and then archived after 30 days old, items which were already over 30 days old will not be affected.
Out of the box, there are a number of default tags, and also a default policy called Default MRM Policy (MRM stands for Messaging Records Management).

In Exchange Online, the Default MRM Policy is applied to every user as above, and this has many tags set already. This may be confusing since it seems that all of these settings are already, the policy contains all of the tags below. Navigate to Exchange Online > Compliance Management > Retention Policies:

The tag details are shown on the Tags tab:

However, all the tags which show Personal do not do anything by default. These are available to users to use if they wish via Outlook, using the Assign Policy button (as long as this has not been removed via Group Policy).

If you create a new tag you can see what the tag types actually do. Only Default and folder tags automatically process emails on their behalf.
Tags can be the following types:
- Applied to the entire mailbox (default) – deletion, retention, and archive
- Applied to default folders – deletion and retention only
- Personal (applied by users) – deletion and retention only

So in the list of default tags in the Default MRM Policy, only Default 2 year move to archive, Deleted Items, and Junk Email do anything automatically for users mailboxes. Of course, you may not want these settings.
Create and apply Retention Tags and Retention Policies
So if you want to change the archiving policy, or create your own, there are 2 approaches:
- Edit the Default MRM Policy to suit your requirements by modifying the tags. This is already applied to all users.
- Create your own policy, apply it to existing users, and then change the mailbox plan to apply to future mailboxes.
I would recommend the first approach as it leavers a more clearly defined policy compared to leaving the default, and it seems to be impossible to remove the default policy.
The Default MRM Policy will be already applied to any existing users, and will also apply to all new users. The advantage of using this is that you will never have to worry that the policy is not applied to some users since it will automatically apply to every user. So this is one less thing for your service desk to do when they create users, and therefore less chance of something going wrong and users not being compliant with your policy. For this reason, I would recommend editing the default policy. You can also rename it without any issues.
The other option you have is what to do about the personal tags. This is one of those features that I have never seen anyone use. What user is going to tag an email because they want it to be deleted in 1 week? Either an email is deleted or kept and the time of reading. There is no harm in leaving them, but it does make the policy somewhat confusing to look at so I recommend making a note of the existing tags and then deleting any personal tags. You could export the config to a CSV file.
So let’s go ahead and modify the tags to suit your needs. As with many things in Office 365, this can be done using the portal or PowerShell, so we’ll cover both.
Delete existing tags
Delete any personal tags using the portal, or simple using PowerShell, first connect to Exchange Online using PowerShell – see here for a quick guide: https://cloudrun.co.uk/powershell/connecting-to-office-365-using-powershell/.
Backup the current policies and tags
Now let’s take a copy of the Retention Policies and Tags in case we ever need them.
Get-RetentionPolicy| select-object Name,IsDefault,RetentionPolicyTagLinks | export-csv -NTI c:\temp\retention_policies.csv #Backup the policies

Get-RetentionPolicyTag| Select-Object Name,Type,RetentionAction,AgeLimitForRetention,Comment | export-csv -NTI c:\temp\retention_policy_tags.csv #Backup the tags

get-mailbox | select-object Name,RetentionHoldEnabled,RetentionPolicy | export-csv -NTI c:\temp\retention_policies_applied.csv #Backup which policies are applied to which users
Enable Exchange Online customization
Note that you may receive an error when running Remove-RetentionPolicyTag below, if so you need to run this command first:
Enable-OrganizationCustomizationDelete the personal tags
Get-RetentionPolicyTag -Types Personal | Remove-RetentionPolicyTag

Confirm

Are you sure you want to perform this action?

Removing the retention policy tag named "Never Delete". This will remove the tag from all mailbox items which have this tag applied, but will not delete the items.

[Y] Yes [A] Yes to All [N] No [L] No to All [?] Help (default is "Y"):
Now you are left with just 3 tags, a default archive tag, a deleted items tag, and a junk email tag. If you are using an external email filtering service, you may not need the junk email tag so I would delete that as well. You will end up with just 3 visible in the console, which makes it a log easier to see what is going on:

If you use Get-RetentionPolicyTag | ft Name,Type you will also see the Recoverable Items 14 days move to archive which we will come on to later.
Modify the Retention Tags
You could create any extra tags you need for the default policy at this point. If you are happy with the tags you have left, we can then modify them as required.
First, check the retention tag settings:
Get-RetentionPolicyTag |ft Name,AgeLimitForRetention,RetentionActionFirst, edit the archive policy, change the name and the retention period using the portal:

Or using PowerShell:
Set-RetentionPolicyTag -Identity "Default 2 year move to archive" -Name "6 months move to archive" -AgeLimitForRetention 183Modify the deleted items tag so that items remain in deleted items for 60 days before being deleted if you need to (the default is 30 days):
Set-RetentionPolicyTag -Identity "Deleted Items" -AgeLimitForRetention 60Modify the Junk email tag:
Set-RetentionPolicyTag -Identity "Junk Email" -AgeLimitForRetention 14 #Change from the default 30 days

Remove-RetentionPolicyTag -identity "Junk Email" #Or even delete it
Note that if you delete a tag, you can use the CSV export to recreate it:
New-RetentionPolicyTag -Name "Junk Email" -Type "JunkEmail" -AgeLimitForRetention 30Modify the RecoverableItems archive tag
There is one tag which is not visible using the web admin console. If you look at the tags with PowerShell you will see an extra RecoverableItems tag:
Get-RetentionPolicyTag |ft -auto

Name Type Description

---- ---- -----------

Recoverable Items 14 days move to archive RecoverableItems Managed Content Settings

Junk Email JunkEmail Managed Content Settings

Deleted Items DeletedItems Managed Content Settings

Default 2 year move to archive All Managed Content Settings
As per https://docs.microsoft.com/en-us/office365/securitycompliance/increase-the-recoverable-quota-for-mailboxes-on-hold?redirectSourcePath=%252fen-us%252farticle%252fIncrease-the-Recoverable-Items-quota-for-mailboxes-on-hold-a8bdcbdd-9298-462f-b889-df26037a990c ‘The Recoverable Items folder for an Exchange Online mailbox exists to protect from accidental or malicious deletions. It’s also used to store items that are retained and accessed by Office 365 compliance features, such as holds and eDiscovery searches.’
This retention tag moves items from the Recoverable Items folder in the user’s primary mailbox to the Recoverable Items folder in the user’s archive mailbox after the 14-day retention period expires for an item.
So this is used to ensure that the users recoverable items folder does not get too large in case a user is on hold or subject to a retention policy. I therefore recommend leaving this in place, but just increasing it to 30 days in line with the
Remove-RetentionPolicyTag -Identity "Recoverable Items 14 days move to archive"

Set-RetentionPolicyTag -Identity "Recoverable Items 14 days move to archive" -Name "Recoverable Items 30 days move to archive"  -AgeLimitForRetention 30
Retention Policy Options
Now, the tags are configured and already applied to all users since they are in the Default MRM Policy. Now we could just enable the archive mailbox for users, however we are going to create a new policy. This is a slightly cleaner since and you end up with a mailbox plan which is actually listed in the mailbox plan, otherwise the default MRM policy is not listed in the plan even though it is applied. The benefit is that it is more obvious to support staff how the policy has been applied.
As already mentioned you have 2 options at this stage:
1. Rename the default Retention Policy
Now we can rename the default policy either using the console or PowerShell:
get-retentionpolicy -Identity "Default MRM Policy" | Set-RetentionPolicy -Name "MyOrg Archive and Retention Policy"2. Create a new Retention Policy
I don’t do this now because removing the default policy does not work, but in case you want to:
New-RetentionPolicy "MyOrg Archive and Retention Policy"

Remove-RetentionPolicy "Default MRM Policy" #Remove the default policy
Add the retention tags to the your MRM policy
Either way, carry on and add your tags to the policy:
Check your tag names using get-retentionpolicytag and then set in the policy:
Set-RetentionPolicy "MyOrg Archive and Retention Policy" -RetentionPolicyTagLinks "Recoverable Items 30 days move to archive","Junk Email","Deleted Items","6 months move to archive"Note that you have to specify all of the tag links at the same time whenever you do this, the list is not appended to.
Set the MRM Policy on all existing mailboxes
get-mailbox | Set-Mailbox -RetentionPolicy "MyOrg Archive and Retention Policy"Set the MRM Policy in the mailbox plan
Get-MailboxPlan -Identity ExchangeOnlineEnterprise* | Set-MailboxPlan -RetentionPolicy "MyOrg Archive and Retention Policy"

Get-MailboxPlan -Identity ExchangeOnlineEnterprise* | fl *retention* #Check the setting has applied
Enable archive mailboxes
We also need to enable the archive mailbox for users. Use a script similar to below on a regular basis, unfortunately this cannot be done automatically for new users. I suggest you incorporate this into your JML process.
For cloud only accounts:
Get-Mailbox -Filter {ArchiveStatus -Eq "None" -AND RecipientTypeDetails -eq "UserMailbox"} | Enable-Mailbox -ArchiveFor hybrid accounts synced from on-premises AD, you need to use the on-premises Exchange PowerShell console:
Get-RemoteMailbox | Enable-RemoteMailbox -ArchiveNote that you can also enable a remote archive for an on-premises user, which is useful if you want to migrate data directly into an archive. This has to be done on the Exchange 2010 server if a mailbox is still on 2010 and you use 2016 for hybrid. Just right click and enable archive, and then choose Cloud-based archive or remote hosted archive, ahd you should see your tenant name if you have Exchange hybrid configured. You can do this using PowerShell on your 2010 servers:
Get-Mailbox -Identity mailboxalias | Enable-Mailbox -RemoteArchive -ArchiveDomain 'tenantname.mail.onmicrosoft.com'Checking archive status
Get everyone with no archive:
Get-Mailbox * | Where-Object {$_.ArchiveStatus -eq "None"} | select UserPrincipalName,ArchiveStatus | ft -wrap
Get the archive status for all users:
Get-Mailbox * | select UserPrincipalName,ArchiveStatus | ft -wrapExport a CSV with the archive status for all users:
Get-Mailbox * -resultsize unlimited | select Name,UserPrincipalName,ArchiveStatus | export-csv c:\temp\archive.csvCheck the remote archive status for your on-prem users:
Get all users with a remote archive:
Get-Mailbox  | Where-Object {$_.ArchiveDomain -ne $null}

#Or

Get-Mailbox  | Where-Object {$_.ArchiveDomain -eq "tenantname.mail.onmicrosoft.com"}
And finally, check the size of users online archives:
Get-Mailbox * | Where-Object {$_.ArchiveStatus -eq "Active"} | Get-Mailboxstatistics -archive | ft DisplayName,TotalItemSize,ItemCountUnfortunately you can’t do this for an on-premises user with a remote archive, otherwise you get an error:
Currently, you can’t run Get-MailboxStatistics -Archive on a cloud-based archive.
Set the Deleted Item Retention period (Recoverable Items Folder)
The other thing which you may wish to set is length of time that deleted items are retained in the Recoverable Items Folder (RIF). You can set this for all existing users, and then update the plan for all future users.
Check the setting for all existing users:
Get-Mailbox | ft Name,RetainDeletedItemsFor,IsDefaultIncrease to the maximum of 30 days for all users:
Get-Mailbox | Set-Mailbox -RetainDeletedItemsFor 30We can also set this as the default in the mailbox plan so that we don’t need to do this again, all new users will inherit this setting. First, check your mailbox plans:
Get-MailboxPlan | ft Name,RetainDeletedItemsFor,IsDefault

Name RetainDeletedItemsFor IsDefault
---- --------------------- ---------
ExchangeOnline-b59b990c-381f-40b3-841e14.00:00:00 False
ExchangeOnlineEnterprise-4dd99fcb-9272-48da-935514.00:00:00 True
ExchangeOnlineEssentials-6108b498-b39a-4398-9acd14.00:00:00 False
ExchangeOnlineDeskless-7736e6c6-f867-43e4-a01714.00:00:00 False
You can see that the ExchangeOnlineEnterprise plan is the default and the one that we want to change.
Now change the setting:
Get-MailboxPlan -Identity ExchangeOnlineEnterprise* | set-MailboxPlan -RetainDeletedItemsFor 30Now you can use the previous command to check whether the setting has applied. An interesting point to note here is that if you do Get-MailboxPlan -Identity ExchangeOnlineEnterprise* |fl Name,Retention* you will see that the default retention policy is blank, even though it is setting the Default MRM Policy for all new mailboxes.
Note that mailbox plans only apply to new mailboxes at the time of creation.
Hit up Paul Cunningham’s excellent blog here for more details on mailbox plans: https://practical365.com/exchange-online/controlling-exchange-online-mailbox-features-mailbox-plans/
Start processing emails
You can either wait some time for Exchange to start processing your rules, or do it now for all users, this has to be done in a loop rather than piped:
$mailboxes = Get-Mailbox

foreach ($mailbox in $mailboxes) { $mailbox.name; Start-ManagedFolderAssistant –Identity "$mailbox" }
Note that this command will often result in errors, if so just wait or run it again several times. This is a known issue, see https://answers.microsoft.com/en-us/msoffice/forum/all/rpc-error-when-using-powershell-command-start/4ab08cca-7215-4295-90e5-85c2fa584e93
There’s more information here: