How to set the network adapter priority order in Windows 10 or Server 2016 using PowerShell.
You may want to change the network adapter priority for Windows clients, for example to prioritise the use of wired LAN over wireless , in the situation where they are connect to both. Not only will this provide a more stable connection speed, it will reduce congestion on the wireless network, and provide a better experience for users who are genuinely roaming
Windows 10 includes an automatic metric feature, where it will set a metric for an interface depending on the speed of the connection. See https://support.microsoft.com/en-gb/help/299540/an-explanation-of-the-automatic-metric-feature-for-ipv4-routes for more details. However if you are on a 100mbps LAN, your WiFi may well end up as the priority.
The automatic metric values are as below for Windows 10:
|
Link Speed
|
Metric
|
|---|---|
| Greater than or equal to 100 Gb | 5 |
| Greater than or equal to 40 Gb and less than 100 Gb | 10 |
| Greater than or equal to 10 Gb and less than 40 Gb | 15 |
| Greater than or equal to 2 Gb and less than 10 Gb | 20 |
| Greater than or equal to 200 Mb and less than 2 Gb | 25 |
| Greater than or equal to 80 Mb and less than 200 Mb | 35 |
| Greater than or equal to 20 Mb and less 80 Mb | 45 |
| Greater than or equal to 4 Mb and less than 20 Mb | 55 |
| Greater than or equal to 500 Kb and less than 4 Mb | 65 |
| Less than 500 Kb | 75 |
The method of setting the network adapter priority changed with Windows 10, you can no longer use the old method of changing the binding order (in Network Connections > Adapter Settings > Advanced > Advanced Settings) and used to include the ability to prioritise network adapters, however this feature has been removed in Windows 10. However it is very easy to achieve using PowerShell.
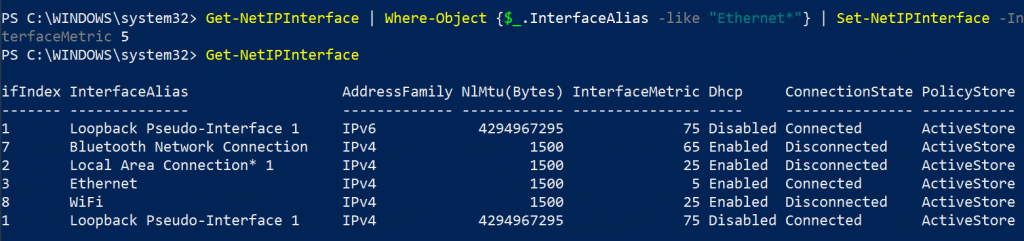
If you run Get-NetIPInterface you can see the metric being used for your adapters. In this case, WiFi is using a lower metric, because the LAN is running at 100mbps and the WiFi is actually faster. But I want clients to use the LAN if they are plugged in.

The WiFi has a metric of 25, but Ethernet has a metric of 35, so the WiFi will be used as a priority. So we’ll just set the priority to be lower for the Ethernet adapter. Put this in a GPO or Appsense policy, and it will be set for any Ethernet adapter.
Get-NetIPInterface | Where-Object {$_.InterfaceAlias -like "Ethernet*"} | Set-NetIPInterface -InterfaceMetric 5
As you can see the metric is now 5. This setting will persist.
See the following links for more information:
https://docs.microsoft.com/en-us/powershell/module/nettcpip/set-netipinterface?view=win10-ps