Overview
created:
Managing Active Directory Groups with PowerShell: A Comprehensive Guide
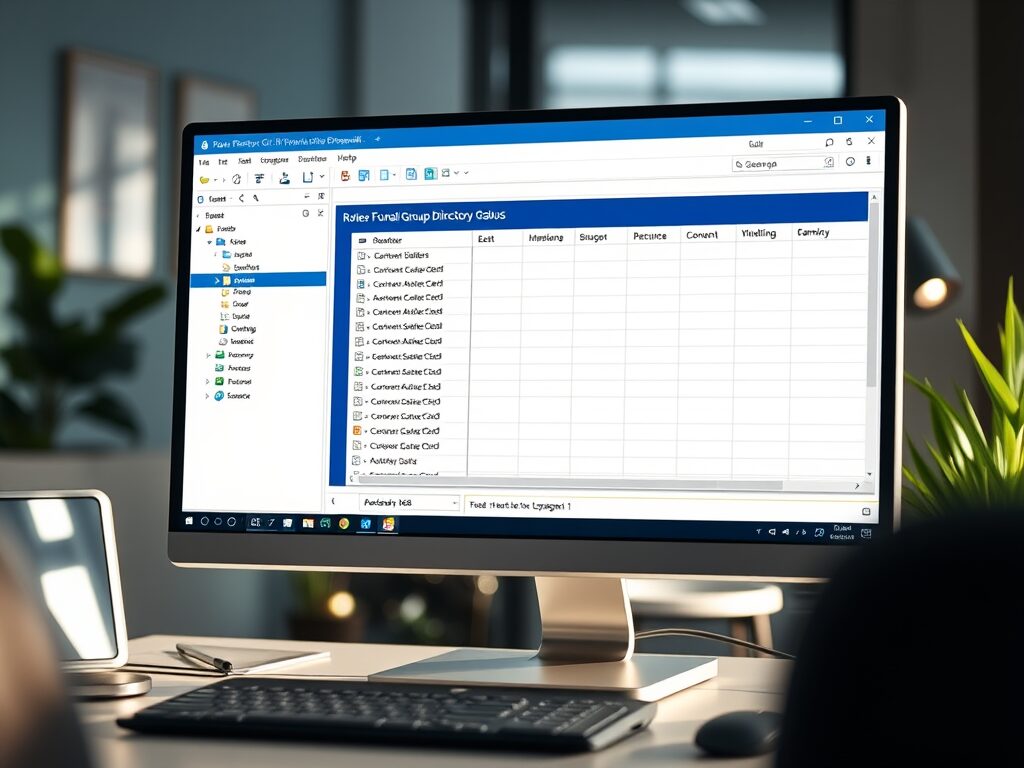
This is a simple PowerShell GUI script, using Winforms with datagrid, which allows normal users to view AD group members, and if they have the delegated admin or group owner, add or remove members.
In this blog post, we’ll explore a PowerShell script that provides a GUI for managing AD group members, including adding and removing users, and displaying group members in a resizable grid view.
Features of the Script
- User-Friendly GUI: The script uses Windows Forms to create a graphical user interface (GUI) that makes it easy to manage AD group members without needing to use the AD Users and Computers tool.
- Add and Remove Users: The script provides buttons to add and remove users from an AD group. Simply enter the username and group name, and click the appropriate button.
- Display Group Members: The script includes a
DataGridViewthat displays the current members of the specified AD group. The grid view is resizable, allowing you to adjust it to your preferred size. - Error Handling: The script includes error handling to display messages if there are issues adding or removing users. These messages are displayed in a label below the grid view, making it easy to see what went wrong.
- Total User Count: The script displays the total number of users in the group, providing a quick overview of the group’s size.
- Resizable Components: The
DataGridViewand labels are anchored to ensure they resize dynamically with the form, providing a flexible and responsive interface.
Benefits of Using the Script
- Ease of Use: The GUI simplifies the process of managing AD group members, making it accessible even for those who are not familiar with PowerShell or AD management tools.
- Efficiency: The script automates the process of adding and removing users, reducing the time and effort required to manage AD groups manually.
- Real-Time Updates: The script automatically refreshes the group members table after adding or removing a user, ensuring you always have the most up-to-date information.
- Error Visibility: By displaying error messages directly in the GUI, the script makes it easy to identify and address issues without needing to check logs or other sources.
- Customizable: The script can be easily modified to fit specific needs, such as adding additional fields or customizing the appearance of the GUI.
How to Use the Script
- Set Up Your Environment: Ensure you have the necessary permissions to manage AD groups and that the Active Directory module is installed on your system.
- Run the Script: Save the script as a
.ps1file and run it in PowerShell. The GUI will open, allowing you to enter the username and group name. - Manage Group Members: Use the “Add User” and “Remove User” buttons to manage group members. Click the “Show Users” button to display the current members of the group in the grid view.
- Resize the Form: Adjust the size of the form as needed. The
DataGridViewand labels will resize dynamically to fit the form.
Conclusion
This PowerShell script provides a powerful and user-friendly way to manage AD group members. With its intuitive GUI, real-time updates, and robust error handling, it simplifies the process of managing AD groups and enhances efficiency. Whether you’re an IT professional or a system administrator, this script is a valuable tool for managing your Active Directory environment.
Add-Type -AssemblyName System.Windows.Forms
Add-Type -AssemblyName System.Drawing

# Create the form
$form = New-Object System.Windows.Forms.Form
$form.Text = "Manage AD Group"
$form.Size = New-Object System.Drawing.Size(800,500)

# Create a label and textbox for the username
$labelUser = New-Object System.Windows.Forms.Label
$labelUser.Text = "Username:"
$labelUser.Location = New-Object System.Drawing.Point(10,20)
$form.Controls.Add($labelUser)

$textBoxUser = New-Object System.Windows.Forms.TextBox
$textBoxUser.Location = New-Object System.Drawing.Point(110,20)
$textBoxUser.Size = New-Object System.Drawing.Size(250,20)
$form.Controls.Add($textBoxUser)

# Create a label and textbox for the group name
$labelGroup = New-Object System.Windows.Forms.Label
$labelGroup.Text = "Group Name:"
$labelGroup.Location = New-Object System.Drawing.Point(10,60)
$form.Controls.Add($labelGroup)

$textBoxGroup = New-Object System.Windows.Forms.TextBox
$textBoxGroup.Location = New-Object System.Drawing.Point(110,60)
$textBoxGroup.Size = New-Object System.Drawing.Size(250,20)
$form.Controls.Add($textBoxGroup)

# Create a DataGridView to display the group members
$dataGridView = New-Object System.Windows.Forms.DataGridView
$dataGridView.Location = New-Object System.Drawing.Point(10,100)
$dataGridView.Size = New-Object System.Drawing.Size(750,250)
$dataGridView.AutoSizeColumnsMode = [System.Windows.Forms.DataGridViewAutoSizeColumnsMode]::Fill
$dataGridView.Anchor = [System.Windows.Forms.AnchorStyles]::Top -bor [System.Windows.Forms.AnchorStyles]::Bottom -bor [System.Windows.Forms.AnchorStyles]::Left -bor [System.Windows.Forms.AnchorStyles]::Right
$form.Controls.Add($dataGridView)

# Create a label to display the total number of users
$labelTotalUsers = New-Object System.Windows.Forms.Label
$labelTotalUsers.Location = New-Object System.Drawing.Point(10,360)
$labelTotalUsers.Size = New-Object System.Drawing.Size(750,20)
$labelTotalUsers.Anchor = [System.Windows.Forms.AnchorStyles]::Bottom -bor [System.Windows.Forms.AnchorStyles]::Left -bor [System.Windows.Forms.AnchorStyles]::Right
$form.Controls.Add($labelTotalUsers)

# Create a label to display error messages
$labelError = New-Object System.Windows.Forms.Label
$labelError.Location = New-Object System.Drawing.Point(10,390)
$labelError.Size = New-Object System.Drawing.Size(750,40)
$labelError.Anchor = [System.Windows.Forms.AnchorStyles]::Bottom -bor [System.Windows.Forms.AnchorStyles]::Left -bor [System.Windows.Forms.AnchorStyles]::Right
$form.Controls.Add($labelError)

# Create a button to add the user to the group
$buttonAdd = New-Object System.Windows.Forms.Button
$buttonAdd.Text = "Add User"
$buttonAdd.Location = New-Object System.Drawing.Point(380,20)
$buttonAdd.Add_Click({
    $username = $textBoxUser.Text
    $groupname = $textBoxGroup.Text
    $labelError.Text = ""
    if ([string]::IsNullOrWhiteSpace($username) -or [string]::IsNullOrWhiteSpace($groupname)) {
        $labelError.ForeColor = [System.Drawing.Color]::Red
        $labelError.Text = "Please enter both a username and a group name."
    } else {
        try {
            Add-ADGroupMember -Identity $groupname -Members $username
            $labelError.ForeColor = [System.Drawing.Color]::Green
            $labelError.Text = "User $($textBoxUser.Text) added to group successfully!"
            ShowGroupMembers
        } catch {
            $labelError.ForeColor = [System.Drawing.Color]::Red
            $labelError.Text = "Error adding user to group: $_"
        }
    }
})
$form.Controls.Add($buttonAdd)

# Create a button to remove the user from the group
$buttonRemove = New-Object System.Windows.Forms.Button
$buttonRemove.Text = "Remove User"
$buttonRemove.Location = New-Object System.Drawing.Point(480,20)
$buttonRemove.Size = New-Object System.Drawing.Size(90,20)  # Adjusted size to make it wider
$buttonRemove.Add_Click({
    $username = $textBoxUser.Text
    $groupname = $textBoxGroup.Text
    $labelError.Text = ""
    if ([string]::IsNullOrWhiteSpace($username) -or [string]::IsNullOrWhiteSpace($groupname)) {
        $labelError.ForeColor = [System.Drawing.Color]::Red
        $labelError.Text = "Please enter both a username and a group name."
    } else {
        try {
            Remove-ADGroupMember -Identity $groupname -Members $username -Confirm:$false
            $labelError.ForeColor = [System.Drawing.Color]::Green
            $labelError.Text = "User $($textBoxUser.Text) removed from group successfully!"
            ShowGroupMembers
        } catch {
            $labelError.ForeColor = [System.Drawing.Color]::Red
            $labelError.Text = "Error removing user from group: $_"
        }
    }
})
$form.Controls.Add($buttonRemove)

# Function to show group members in the DataGridView
function ShowGroupMembers {
    $groupname = $textBoxGroup.Text
    if ([string]::IsNullOrWhiteSpace($groupname)) {
        $labelError.ForeColor = [System.Drawing.Color]::Red
        $labelError.Text = "Please enter a group name."
    } else {
        try {
            $groupMembers = Get-ADGroupMember -Identity $groupname | get-aduser | Sort-Object SamAccountName

            # Convert to DataTable
            $dataTable = New-Object System.Data.DataTable
            $dataTable.Columns.Add("SamAccountName")
            $dataTable.Columns.Add("UserPrincipalName")
            $dataTable.Columns.Add("OU")

            foreach ($member in $groupMembers) {
                # Extract the first match after OU=
                if ($member.distinguishedName -match "OU=([^,]+)") {
                    $firstOU = $matches[1]
                } else {
                    $firstOU = "N/A"
                }

                $row = $dataTable.NewRow()
                $row["SamAccountName"] = $member.SamAccountName
                $row["UserPrincipalName"] = $member.UserPrincipalName
                $row["OU"] = $firstOU
                $dataTable.Rows.Add($row)
            }

            $dataGridView.DataSource = $dataTable
            $labelTotalUsers.Text = "Total Users: " + $dataTable.Rows.Count
        } catch {
            $labelError.ForeColor = [System.Drawing.Color]::Red
            $labelError.Text = "Error retrieving group members: $_"
        }
    }
}

# Create a button to show existing users in the group
$buttonShow = New-Object System.Windows.Forms.Button
$buttonShow.Text = "Show Users"
$buttonShow.Location = New-Object System.Drawing.Point(380,60)
$buttonShow.Add_Click({
    ShowGroupMembers
})
$form.Controls.Add($buttonShow)

# Show the form
$form.ShowDialog()