
A very frequent request from developers is to grant access to a SharePoint site from a service principal. This is how we typically do this, using an app registration along with sites.selected API permission.
The Sites.Selected permission in Microsoft Graph provides several benefits when it comes to controlling app-specific access to specific SharePoint sites:
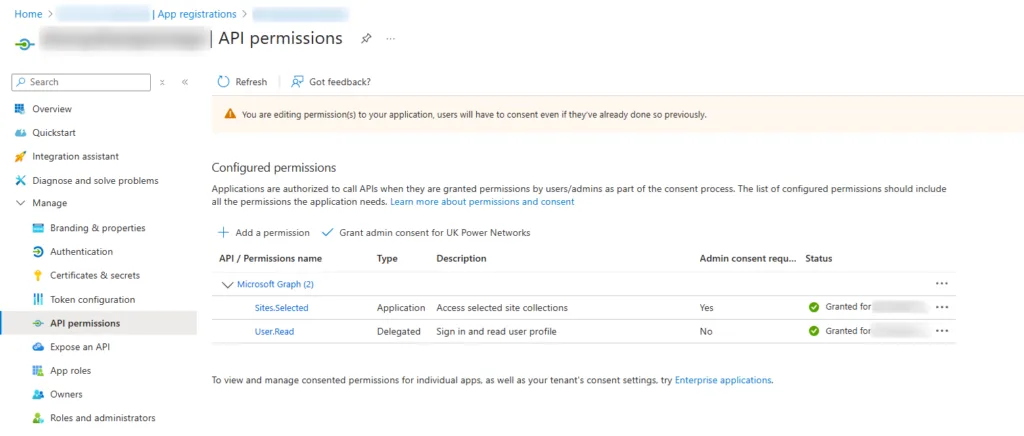
This will be the app reg that the developer or app will use.
Note that Sites.Read.All is not required and should not be added, since this gives read access to all sites.
You can use Graph Explorer or PowerShell:
Using Graph Explorer:
https://graph.microsoft.com/v1.0/sites/{tenant}.sharepoint.com:/sites/{sitename}Create a local certificate:
$CertParam = @{
    'KeyAlgorithm'      = 'RSA'
    'KeyLength'         = 2048
    'KeyExportPolicy'   = 'NonExportable'
    'DnsName'           = 'powershell.domain.com'
    'FriendlyName'      = 'Graph PowerShell app'
    'CertStoreLocation' = 'Cert:\CurrentUser\My\'
    'NotAfter'          = (Get-Date).AddYears(2)
}
$Cert = New-SelfSignedCertificate @CertParam
Export-Certificate -Cert $Cert -FilePath c:\temp\GraphPowerShellApp.cerInstall or update the Microsoft.Graph module:
Install-Module Microsoft.Graph -Scope CurrentUserConnect using the app registration and certificate:
$AppId = "your-app-id"
$TenantId = "your-tenant-id"
$Certificate = Get-ChildItem Cert:\CurrentUser\My\ | Where-Object { $_.Subject -like "*Graph PowerShell*" }
Connect-MgGraph -TenantId $TenantId -AppId $AppId -Certificate $Certificate$siteId = "tenant.sharepoint.com,xxxxxx-6710-417e-bd83-xxxxx,xxxxxx-b61c-49dd-af50-xxxxx"
$params = @{
roles = @("write")
grantedToIdentities = @(
@{
application = @{
id = "target-app-client-id"
displayName = "TargetAppName"
}
}
)
}
New-MgSitePermission -SiteId $siteId -BodyParameter $paramsOr use the full script which gets the Site ID automatically:
$siteURL = "https://tenant.sharepoint.com/sites/sitename"
$siteFix = $siteURL -replace "https://", ""
$siteFix = $siteFix -replace "sharepoint.com", "sharepoint.com:"

try {
    $Site = Get-MgSite -siteId $siteFix
} catch {
    Write-Host "Site not found" -ForegroundColor Red
    Exit
}
$siteId = $Site.Id
Write-Host "Found site: $($Site.DisplayName) $($Site.WebUrl)" -ForegroundColor Green

$params = @{
    roles = @("write")
    grantedToIdentities = @(
        @{
            application = @{
                id = "target-app-client-id"
                displayName = "TargetAppName"
            }
        }
    )
}

New-MgSitePermission -SiteId $siteId -BodyParameter $paramsAfter granting Sites.Selected permissions, use Get-MgSitePermission to verify what permissions are applied to a site:
# Get all permissions for a specific site
$siteId = "tenant.sharepoint.com,xxxxxx-6710-417e-bd83-xxxxx,xxxxxx-b61c-49dd-af50-xxxxx"
Get-MgSitePermission -SiteId $siteId

# Filter to show only application permissions
Get-MgSitePermission -SiteId $siteId | Where-Object { $_.GrantedToIdentities.Application -ne $null }

# View permissions in a readable format
Get-MgSitePermission -SiteId $siteId | ForEach-Object {
    $app = $_.GrantedToIdentities.Application
    if ($app) {
        [PSCustomObject]@{
            AppName   = $app.DisplayName
            AppId     = $app.Id
            Roles     = $_.Roles -join ", "
        }
    }
}
You can also use this to audit which apps have access to which sites across your tenant.
| Cmdlet | Purpose |
|---|---|
Get-MgSitePermission | List permissions applied to a SharePoint site |
New-MgSitePermission | Grant Sites.Selected permission to an app |
Update-MgSitePermission | Modify existing site permissions (e.g., change roles) |
Remove-MgSitePermission | Revoke an app’s access to a specific site |
Get-MgSite | Retrieve a SharePoint site by URL or ID |
Get-MgSubSite | List sub-sites under a parent site |
These cmdlets give you full control over SharePoint site permissions via Microsoft Graph PowerShell, whether you’re granting, auditing, or revoking access.
Sites.Selected provides fine-grained control over which sites an application can access, allowing you to tailor permissions to your specific use case. It’s easy to use PowerShell and Microsoft Graph to add this.
See Microsoft’s official blog post for more details.

